Next.js is an advanced framework developed based on React to enable developers to work on full-stack web applications optimized for performance and user-end interaction. Coming with several features, such as SSR, SSG, automatic code splitting, and routing, among others, it makes development easy and fast while enhancing page load and SEO performance. Next, one of the prominent features of the proposed model is the capability to make recommendations based on the current customer environment.
One of the strengths of js is that it offers the developers the ability to decide which of the mentioned rendering techniques is the most appropriate for each page, the SSR can be used for pages that contain a lot of dynamic content, while the SSG seems to be suitable for the static pages. Additionally, Next. js automates some of the features of images like whether an image should be used on a mobile tablet or desktop, their size and the format of the image used.

Migrating from a standard React application to Next.js presents several advantages. For instance, applications built with Next.js can achieve up to 50% faster load times compared to traditional React apps, primarily due to its SSR and SSG capabilities. This performance improvement not only enhances user experience but also significantly boosts SEO, as search engines can easily index pre-rendered pages.
This blog describes the process of how to start converting an existing React project into Next.js, explaining all the benefits the framework offers and giving a detailed description of the migration process.
Hire top React developers with Index.dev and ensure a seamless transition to Next.js. Get access to vetted talent in 48hrs with a risk-free 30-day trial.
Prerequisites
Existing React project (preferably created with Create React App)
Before deciding to migrate an existing React project to Next, the following factors are taken into consideration. There are, however, general requirements that have to be fulfilled for a successful transition to JS. Before that, you have to have a Create React App (CRA) project created to begin with.
CRA is an essential UI tool that speeds up the process of creating a new React application by offering a fully functional development environment where developers don’t have to spend a lot of time setting up build tools. In a survey conducted by Stack Overflow, around 60% of developers use CRA as the go-to tool to create new React applications.
Node.js and npm installed on the development machine
Additionally, it is essential to have Node.js and npm (Node Package Manager) installed on your development machine. Node.js is a JavaScript runtime that enables the execution of JavaScript code on the server side, while npm is a package manager that facilitates the installation and management of libraries and dependencies.
As of 2023, Node.js has more than 50% usage among server-side technologies making it a key piece of the web development puzzle. Installing Node.js also comes with npm, which is used for managing the project and its dependencies efficiently. Ensuring that both Node.js and npm are up-to-date can greatly affect the performance of your developments since they are the key tools for the construction, examination, and deployment of the Next. js application. By ensuring that you have met these prerequisites, you are sure to have a good ground to shift your React project to Next.js languages and thus improve the performance and optimum scalability of such JavaScript applications.
Read More: Building Scalable API Integrations in ReactJS - How-to Guide
Step-by-Step Migration Process
Assess Your Current React Application
Start by examining the overall directory structure of your React application. A typical React project might include folders such as:
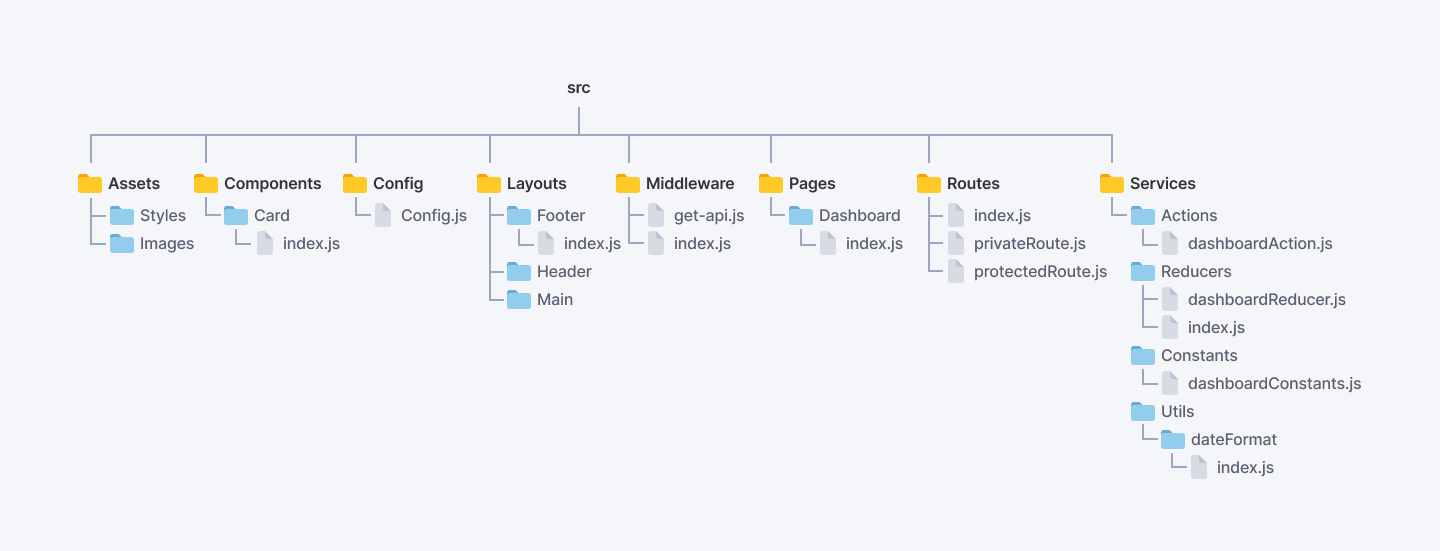
src/:
Contains the main application code.
- components/: Reusable UI components.
- pages/: Components that represent different views or pages in your application.
- hooks/: Custom hooks for shared logic.
- context/: Context API files for state management.
- utils/: Utility functions and helpers.
- assets/: Static files like images and styles.
Identifying Components and Pages
Components:
Review your components/ folder to identify reusable UI components. Check for:
- Component functionality and purpose.
- Prop types and default values.
- State management (local state vs. global state).
Pages:
In the pages/ folder, identify the main views of your application. Each page should ideally correspond to a route in your application. Consider:
- The structure and layout of each page.
- How pages interact with components.
Identify Dependencies
Package Management:
Open your package.json file to review dependencies and devDependencies. Look for:
- Libraries used (e.g., React Router, Redux, Axios).
- Version numbers to ensure they are up-to-date and compatible.
- Any unused or redundant dependencies that can be removed.
Third-Party Libraries:
Assess how third-party libraries are integrated. Check for:
- Documentation and usage patterns.
- Any potential alternatives that may offer better performance or features.
Determine Features That Require Changes
Routing
Current Routing Setup:
Review how routing is currently implemented (e.g., using React Router). Consider:
- The organization of routes and nested routes.
- Dynamic routing and route parameters.
- Any missing routes or pages that need to be added.
User Experience:
Evaluate the user experience of the current routing setup. Look for:
- Smooth transitions between pages.
- Accessibility of routes (e.g., deep linking).
Data Fetching
Current Data Fetching Methods:
Identify how data is currently fetched in your application. Common methods include:
- Fetch API or Axios for HTTP requests.
- GraphQL for querying data.
State Management:
Assess how fetched data is managed:
- Local state management (using useState).
- Global state management (using Context API or Redux).
- Evaluate the efficiency of data fetching and whether it can be optimized (e.g., caching strategies, reducing unnecessary requests).
Error Handling:
Review how errors in data fetching are handled. Consider:
- User feedback mechanisms (loading spinners, error messages).
- Retry logic for failed requests.
React application audit allows you to analyze the current state of your application, recognize the opportunities for optimization, improve project organization, and focus on the end-users. It is helpful if you start here before you progress to advanced tasks which may include refactoring your code, adding new features, or updating to a newer version of React or other related libraries. However, it is always easier to maintain and scale an application which is well organized and has been through the process of assessment.
Read Also: 10 Best Cross Platform Mobile App Development Frameworks in 2024
Setting Up A New Next.js Project
Here's a concise guide on setting up a new Next.js project:
Prerequisites
Before starting, ensure you have the following installed:
- Node.js (version 12 or later)
- npm (version 6 or later) or yarn
Creating a New Project
1. Open your terminal and navigate to the directory where you want to create your project.
2. Run the following command to create a new Next.js project in Bash:
npx create-next-app my-appReplace `my-app` with your desired project name.
3. The command will create a new directory with your project name and install all the necessary dependencies.
4. Once the installation is complete, navigate to your project directory:
cd my-appEnabling TypeScript (Optional)
Next.js supports TypeScript out of the box. To enable TypeScript in your project:
1. Install the required TypeScript dependencies:
npm install --save-dev typescript @types/react @types/node2. Next.js will automatically create a `tsconfig.json` file in your project's root directory.
3. Rename your `.js` and `.jsx` files to `.ts` and `.tsx` respectively.
Understanding the Default Project Structure
A new Next.js project created with `create-next-app` comes with the following default structure:
my-app/
├── node_modules/
├── pages/
│ ├── api/
│ │ hello.js
│ ├── index.js
│ └── _app.js
├── public/
│ ├── favicon.ico
│ ├── images/
│ └── robots.txt
├── styles/
│ ├── globals.css
│ └── Home.module.css
├── .gitignore
├── next.config.js
├── package.json
├── package-lock.json
└── README.md
- `pages/`: Contains your application's pages. Each file corresponds to a route.
- `api/`: Houses your API routes.
- `public/`: Serves static assets like images, fonts, and icons.
- `styles/`: Stores your CSS files.
- `next.config.js`: Allows you to configure Next.js settings.
Running the Development Server
1. Start the development server by running:
npm run devor with yarn:
yarn dev2. Open your browser and navigate to `http://localhost:3000`. You should see your Next.js application running.
That's it! You now have a new Next.js project set up and ready for development. Start building your application by modifying the files in the `pages/` directory.
Directory Structure: Overview of the Default Next.js File Structure
The directory structure of a Next.js application is designed to facilitate a clear and organized development experience. Understanding this structure is crucial for building scalable and maintainable applications. Below is an overview of the default file structure in a Next.js project, highlighting the purpose of each folder and file.
Default Next.js File Structure
1. Top-Level Folders
`app` (or `pages`):
- In Next.js 13 and later, the `app` directory is introduced for the new App Router, which allows for nested routing and layouts. If you are using the traditional Pages Router, this folder will be named `pages`.
- Each JavaScript or TypeScript file within this directory corresponds to a route based on its file name. For example, `about.js` will be accessible at `/about`.
`public`:
- This folder is designated for static assets such as images, fonts, and other files that need to be served directly. Files in this directory can be accessed at the root URL of your application. For example, an image located at `public/images/logo.png` can be accessed via `/images/logo.png`.
`styles`:
- Contains CSS files for styling your application. You can add global styles or specific stylesheets here. By default, Next.js includes a global CSS file named `globals.css`.
`src` (optional):
- This folder can be used to organize your application’s source code. It is not required but can help maintain a cleaner structure, especially in larger applications.
2. Important Files
`.next`:
- This is a generated folder that contains the output of the Next.js build process. It includes optimized assets and compiled code. You typically do not need to interact with this folder directly.
`node_modules`:
- Contains all the third-party libraries and dependencies required for your application. This folder is automatically created when you install packages using npm or yarn.
`package.json`:
- This JSON file manages your project's dependencies, scripts, and metadata. It is essential for defining the packages your application relies on and the scripts for running tasks like building and starting the app.
`next.config.js`:
- An optional configuration file that allows you to customize various aspects of Next.js behavior, such as setting up environment variables, custom webpack configurations, and more.
`.gitignore`:
- A pre-configured file that specifies which files and directories should be ignored by Git. This typically includes `node_modules`, build outputs, and environment files.
`README.md`:
- A markdown file where you can provide information about your project, including setup instructions, usage, and documentation.
3. Routing and Special Files
Dynamic Routes:
- You can create dynamic routes by using brackets in your file names. For example, `[id].js` in the `pages` directory will match routes like `/1`, `/2`, etc., where `id` is a dynamic segment.
Special Files:
- Files like `_app.js`, `_document.js`, and `_error.js` are used for customizing the app's behavior:
`_app.js`:
- Customizes the root component, allowing you to persist layouts or inject global styles.
`_document.js`:
- Customizes the HTML document structure, useful for adding meta tags or external scripts.
`_error.js`:
- Custom error handling page for rendering when an error occurs.
4. Example of a Typical Next.js Project Structure
Here’s a visual representation of a typical Next.js project structure:
my-next-app/
├── app/ # (or pages/ for older versions)
│ ├── about.js
│ ├── index.js
│ └── user/
│ └── [id].js
├── public/ # Static assets
│ ├── images/
│ └── favicon.ico
├── styles/ # CSS files
│ └── globals.css
├── .next/ # Build output (generated)
├── node_modules/ # Dependencies
├── package.json # Project metadata and dependencies
├── next.config.js # Next.js configuration
├── .gitignore # Files to ignore in version control
└── README.md # Project documentation
It is helpful to know where Next sets up its default directory structure. The use of js applications is crucial when it comes to the enhancement of development. Not only it affects routing and data fetching but it also improves modularity aiding collaboration and making the process of application maintenance easier when the application has grown large. By following such a layout, you can guarantee a coherent development process and sound architecture of the resulting application.
Migrate Pages and Components
Moving forward, converting pages and other components to Next. js, especially with the App Router, should be done systematically and is here tactics for restructuring your application. This migration improves the routing and helps you take advantage of new features such as React Server Components. Migrating your pages and components may get cumbersome at times, and for this reason, here is a comprehensive guide on how to do it.
Understanding the Migration Process
1. Preparing for Migration
Before you start the process, make sure that your Next.js project is updated to the latest version which supports the App Router. You can check your dependencies and update them using:
```bash
npm outdated```
2. Create the App Directory
The first step in the migration is to create a new `/app` directory at the root of your Next.js project. This directory will house all your files and components for the App Router.
3. Migrate Layouts
In the traditional Pages Router, the `_app.js` and `_document.js` files are used for customizing the application layout and document structure. In the App Router, this functionality is handled by the `layout.tsx` file.
Migrate `_document.js` to `layout.tsx`:
- Create a new file named `layout.tsx` in the `/app` directory.
- Copy the contents of your existing `_document.js` into `layout.tsx`, removing any imports from `next/document` and replacing `<Html>`, `<Head>`, and `<Main />` with their HTML equivalents: `<html>`, `<head>`, and `{children}`.
4. Migrate Pages
For each page in your `/pages` directory, you will need to create a corresponding folder structure in the `/app` directory.
- Folder Structure: If you have a page at `/pages/about.tsx`, you would create an `/app/about/page.tsx` file.
- Copy Page Components: Copy the contents of your original page component into the new `page.tsx` file.
- Client-Side Functionality: If your page component uses client-side functionality (e.g., hooks, browser APIs), you need to wrap it with the `'use client'` directive at the top of the file.
Example Migration of a Page
Original Page in `/pages`
// pages/about.tsx
const About = () => {
    return <h1>About Us</h1>;
};

export default About;
Migrated Page in `/app`
// app/about/page.tsx
'use client';

const About = () => {
    return <h1>About Us</h1>;
};

export default About;
5. Handling Dynamic Routes
Dynamic routes in the App Router are created using folder names wrapped in brackets. For example, if you have a dynamic user profile page:
Original Dynamic Page in `/pages`
// pages/user/[id].tsx
const User = ({ id }) => {
    return <div>User ID: {id}</div>;
};

export default User;
Migrated Dynamic Page in `/app`
// app/user/[id]/page.tsx
'use client';

const User = ({ params }) => {
    return <div>User ID: {params.id}</div>;
};

export default User;
6. Data Fetching Methods
In the App Router, traditional Next.js data fetching methods like `getStaticProps` and `getServerSideProps` have been replaced with a new API. You can now use `fetch` directly within your components, and the framework handles data fetching seamlessly.
Example of Data Fetching in App Router
// app/posts/page.tsx
import React from 'react';

const Posts = async () => {
    const res = await fetch('https://jsonplaceholder.typicode.com/posts');
    const posts = await res.json();

    return (
        <div>
            <h1>Posts</h1>
            <ul>
                {posts.map(post => (
                    <li key={post.id}>{post.title}</li>
                ))}
            </ul>
        </div>
    );
};

export default Posts;
7. Testing the Migrated Application
After moving to the new location, the application should be tested to confirm that it is operational. Be sure to look for any signs of variance between the Pages Router and the App Router.
8. Incremental Migration
The App Router and the Pages Router can be implemented in the same Next application. The use of js applications for implementing the migration also provides a flexibility of a gradual migration. This can be useful if one has to preserve some features which are not supported by the App Router yet.
Migrating from Next. Some of the differences between js’s traditional Pages Router to the new App Router include; new directory structure, new component, and new data fetching. In doing so, you will be able to improve the routing of your application and leverage the newest features included in Next.js, and this in turn contributes to more efficient and scalabletypically the development of a full application.
Handle Static Assets
Handling static assets in a Next.js application is a straightforward process that involves organizing your files properly and ensuring that your components reference these assets correctly.
Here's how to do it effectively:
Move Static Files to the Public Directory
In Next.js, the `public` directory is for images, fonts, and other files that must be processed and served to the client directly. This means any file placed in this directory will be available at the root level of the application.
Steps to Move Static Files:
1. Create the Public Directory: If it doesn't already exist, create a folder named `public` in the root of your Next.js project.
2. Organize Your Assets: Move your static files into the `public` directory. For example:
- Images: Place them in `public/images`
- Fonts: Place them in `public/fonts`
The structure might look like this:
   /public
       /images
           logo.png
           background.jpg
       /fonts
           custom-font.woff
Update References in Components
Once your static files are in the `public` directory, you need to update the paths in your components to reference these assets correctly.
How to Reference Static Assets:
- Using Absolute Paths: Since the `public` directory is served at the root, you can reference your assets using absolute paths. For example:
To use an image in a component:
    const MyComponent = () => {
        return (
            <div>
                <img src="/images/logo.png" alt="Logo" />
            </div>
        );
};- Using Next.js Image Component: For images, it's recommended to use the `next/image` component, which optimizes images automatically. Here's how to do it:
    import Image from 'next/image';

    const MyComponent = () => {
        return (
            <div>
                <Image src="/images/logo.png" alt="Logo" width={500} height={300} />
            </div>
        );
    };
Example of Updating References
If you previously had a relative path to an image like this:
<img src="../assets/logo.png" alt="Logo" />
```
You would update it to:
```javascript
<img src="/images/logo.png" alt="Logo" />
When you create your Next.js application with the create-next-app command, most of your static files are placed into the `public` directory and the references in your components are set up to reflect the absolute paths to them. Below it can be seen that js applications can serve static assets to users. This organization does not only increase performance but also helps to keep the project neat and easily controlled.
Implement Data Fetching
Applying data fetching in a Next.js application is one of the most significant components while developing Web applications with interactivity. Next.js offers multiple ways of retrieving data with the purpose of developers selecting the best fit depending on their circumstances. Next, we will describe the basic approaches to fetching data. Getting to know three primary techniques: Static Generation (SG), Server-Side Rendering (SSR), Client-Side Rendering (CSR), and providing real-life use-cases for each of them.
Data Fetching Methods in Next.js
1. Static Generation (SG)
Static Generation is a method where the HTML of a page is generated at build time. This approach is ideal for pages that can be pre-rendered and do not require real-time data. Static Generation can be achieved using the `getStaticProps` function.
Using `getStaticProps`
`getStaticProps` is an asynchronous function that fetches data at build time and passes it as props to the page component.
Example:
// pages/posts.js
import React from 'react';

export async function getStaticProps() {
    const res = await fetch('https://jsonplaceholder.typicode.com/posts');
    const posts = await res.json();

    return {
        props: {
            posts,
        },
    };
}

const Posts = ({ posts }) => {
    return (
        <div>
            <h1>Posts</h1>
            <ul>
                {posts.map(post => (
                    <li key={post.id}>{post.title}</li>
                ))}
            </ul>
        </div>
    );
};

export default Posts;
In this example, `getStaticProps` fetches a list of posts from an API and passes it to the `Posts` component as props. The HTML for this page is generated at build time, making it fast to serve.
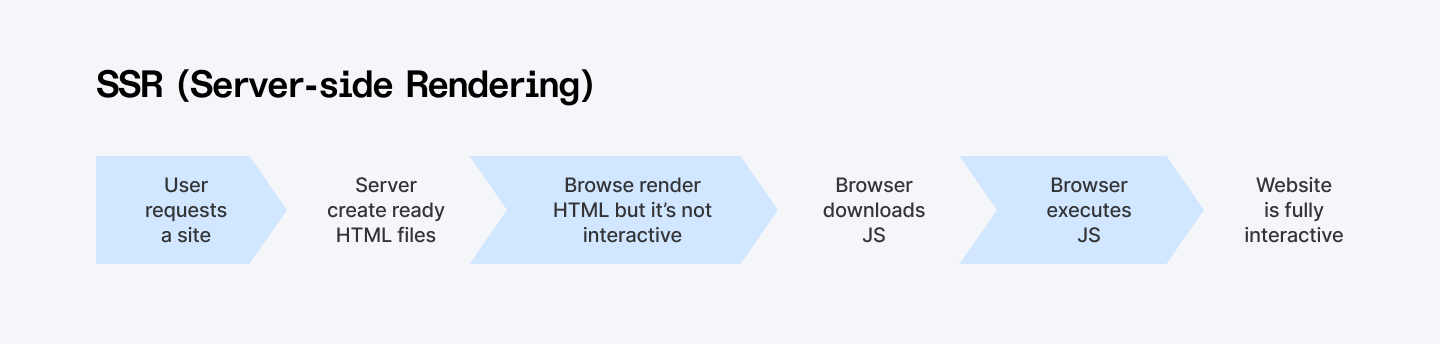
2. Server-Side Rendering (SSR)
Server-side rendering is a method where the HTML of a page is generated each time a request is made. This approach works well on pages that may need current information or customized according to the users’ requests. Advanced SSR can also be done using the function called `getServerSideProps`.
Using `getServerSideProps`
`getServerSideProps` is an asynchronous function that fetches data on each request and passes it as props to the page component.
Example:
// pages/user/[id].js
import React from 'react';

export async function getServerSideProps(context) {
    const { id } = context.params;
    const res = await fetch(`https://jsonplaceholder.typicode.com/users/${id}`);
    const user = await res.json();

    return {
        props: {
            user,
        },
    };
}

const User = ({ user }) => {
    return (
        <div>
            <h1>{user.name}</h1>
            <p>Email: {user.email}</p>
        </div>
    );
};

export default User;
In this example, `getServerSideProps` fetches user data based on the dynamic route parameter `id`. The HTML is generated on each request, ensuring that the user sees the most current data.
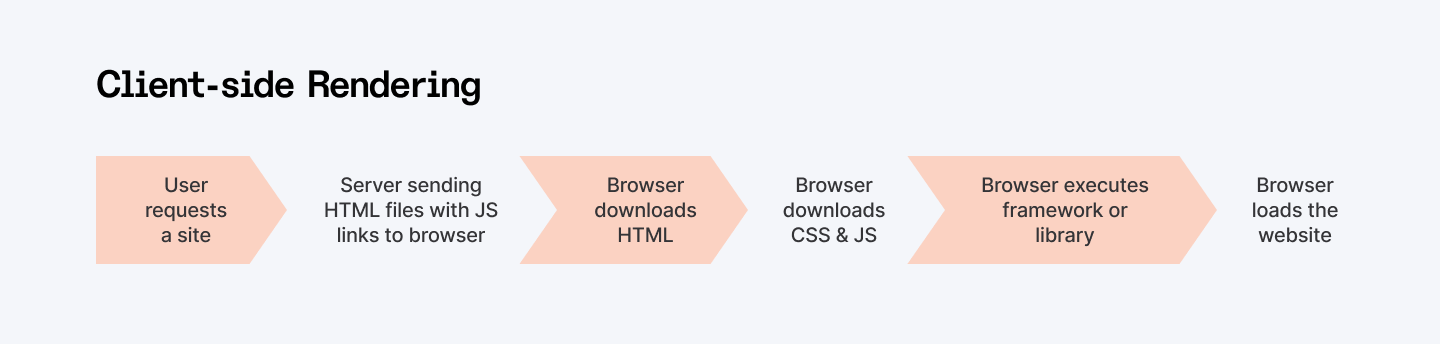
3. Client-Side Rendering (CSR)
Client-side rendering is a method where data is pulled down on the client side after the first page has been downloaded. Such an approach is suitable for interactive parts of the website, or when some data does not have to be rendered beforehand. CSR can be achieved using React hooks like `effect`.
Using `effect` for CSR
Example:
// pages/posts/client.js
import React, { useEffect, useState } from 'react';

const ClientPosts = () => {
    const [posts, setPosts] = useState([]);

    useEffect(() => {
        const fetchPosts = async () => {
            const res = await fetch('https://jsonplaceholder.typicode.com/posts');
            const data = await res.json();
            setPosts(data);
        };

        fetchPosts();
    }, []);

    return (
        <div>
            <h1>Posts (Client-Side Rendering)</h1>
            <ul>
                {posts.map(post => (
                    <li key={post.id}>{post.title}</li>
                ))}
            </ul>
        </div>
    );
};

export default ClientPosts;
In this example, the `ClientPosts` component fetches posts using the `effect` hook after the component mounts. This method allows for dynamic updates without reloading the page.
Choosing the Right Data Fetching Method
When deciding which data fetching method to use, consider the following:
- Static Generation (SG): Use when the data is not frequently updated and can be generated at build time. Ideal for blog posts, documentation, and landing pages.
- Server-Side Rendering (SSR): Use when you need the latest data for each request, such as user-specific data or frequently changing content.
- Client-Side Rendering (CSR): Use for interactive components or when data can be fetched after the initial page load, such as in dashboards or forms.
Implementing data fetching in Next.js is flexible and powerful, allowing developers to choose the most suitable method based on their application's requirements. By doing so, Static Generation, Server-Side Rendering, and Client-Side Rendering can help you in building optimized, interactive, and immersive web apps for users.
Configure State Management
First of all, configuring state management in a Next must be done. There is nothing like the js application it is used for managing state and sharing between different components. As for state management, there are several approaches available out there; however, Redux and the Context API are the most common. Now, let’s turn to these options and how to implement them in your Next. js application.
Options for State Management
1. Redux
Redux is the state management library that offers a single store for managing the state of the application. It is especially helpful when it comes to the development of big applications since managing states in multiple components could easily get out of hand. Redux implements a one-way data flow and uses only actions and reducers to update the state.
Pros:
- Predictable state management
- Middleware support for handling side effects (e.g., Redux Thunk, Redux Saga)
- DevTools for debugging state changes
Cons:
- Boilerplate code can be extensive
- The learning curve for beginners
2. Context API
The Context API is a React API that provides a way to pass data down the component tree without having to pass props down manually through all levels. It is more basic and serves as a lightweight version of Redux which makes it suitable for small-scale applications or if one only requires tracking one global state without the use of the large and comprehensive Redux.
Pros:
- Simpler setup and less boilerplate
- Built into React, no additional libraries are required
- Good for managing global state for small to medium-sized applications
Cons:
- This can lead to performance issues if not used carefully (e.g., unnecessary re-renders)
- Not as powerful as Redux for complex state management
Setting Up Providers in _app.js
In Next.js, the _app.js file is used to initialize pages. This is where you can set up global providers for state management. Below are examples of how to set up both Redux and Context API providers in _app.js.
Setting Up Redux
1. Install Redux and React-Redux with Bash:
npm install redux react-redux2. Create a Redux Store:
Create a file named store.js in your project:
// store.js
import { create store } from 'redux';
const initialState = {
 // Define your initial state here
};
const reducer = (state = initialState, action) => {
switch (action. type) {
 // Define your reducers here
 default:
return state;
  }
};
const store = create store(reducer);
export default store;
3. Wrap Your Application with the Provider:
Update your _app.js file:
// pages/_app.js
import { Provider } from 'react-redux';
import store from '../store';
function MyApp({ Component, pageProps }) {
   return (
 <Provider store={store}>
  <Component {...pageProps} />
</Provider>
  );
}
export default MyApp;
Setting Up Context API
1. Create a Context:
Create a file named MyContext.js:
// MyContext.js
import React, { createContext, useState } from 'react';
export const MyContext = createContext();
export const MyProvider = ({ children }) => {
  const [state, setState] = useState({
 // Define your global state here
  });
   return (
  <MyContext.Provider value={{ state, setState }}>
{children}
  </MyContext.Provider>
  );
};
2. Wrap Your Application with the Provider:
Update your _app.js file:
// pages/_app.js
import { MyProvider } from '../MyContext';
function MyApp({ Component, pageProps }) {
  return (
    <MyProvider>
  <Component {...pageProps} />
</MyProvider>
    );
}
export default MyApp;
By selecting the right state management system (Redux or the Context API) and using the provider in the _app. js, you can handle the state all around the world in your Next. js application. Redux is best for bigger and more precise applications, while the Context API is suitable for less complicated applications. This setup provides an easy means to share state across components hence making your application easy to maintain and scalable.
Optimize Images
Optimizing images is a very important aspect of enhancing the performance and loading time of web applications. Next.js offers a component that is called `next/image` which optimizes the image for the specific type of device the user is using. It improves the user’s experience, and it may also be quite useful in contributing to better SEO.
Using the `next/image` Component
The `next/image` component is designed to handle image optimization automatically. It supports features like lazy loading, responsive images, and automatic format selection (e.g., WebP) based on the user's browser capabilities.
Basic Usage
Here’s a simple example of how to use the `next/image` component:
import Image from 'next/image';

const MyComponent = () => {
    return (
        <div>
            <h1>My Optimized Image</h1>
            <Image
                src="/images/photo.jpg" // Path to the image file in the public directory
                alt="Description of the image"
                width={500} // Desired width
                height={300} // Desired height
                quality={75} // Optional: Image quality (1-100)
            />
        </div>
    );
};

export default MyComponent;
In this example:
- The `src` attribute points to the image file located in the `public` directory.
- The `alt` attribute provides a description for accessibility and SEO.
- The `width` and `height` attributes specify the dimensions of the image, which helps to prevent layout shifts during loading.
Configuration Options for Images
The `next/image` component offers several configuration options to optimize images effectively:
1. Responsive Images
To create responsive images that adapt to different screen sizes, you can use the `layout` property. The `layout` can be set to 'responsive`, which scales the image according to the width of its parent container.
<Image
    src="/images/photo.jpg"
    alt="Description of the image"
    layout="responsive" // Makes the image responsive
    width={500} // Original width
    height={300} // Original height
/>
2. Fill Layout
If you want the image to fill its parent container while maintaining its aspect ratio, you can use the `layout="fill"` property. This requires the parent element to have a defined width and height.
<div style={{ position: 'relative', width: '100%', height: '300px' }}>
    <Image
        src="/images/photo.jpg"
        alt="Description of the image"
        layout="fill" // Image will fill the parent container
        objectFit="cover" // Cover the entire area
    />
</div>
3. Placeholder
You can use a placeholder while the image is loading. The `placeholder` property can be set to `blur` to show a blurred version of the image until it fully loads.
<Image
    src="/images/photo.jpg"
    alt="Description of the image"
    width={500}
    height={300}
    placeholder="blur" // Show a blurred placeholder
    blurDataURL="/images/photo-blur.jpg" // Path to the blurred image
/>
4. Quality
You can control the quality of the image using the `quality` property. This value ranges from 1 (lowest quality) to 100 (highest quality). A lower quality can significantly reduce file size without a noticeable difference in visual quality.
<Image
    src="/images/photo.jpg"
    alt="Description of the image"
    width={500}
    height={300}
    quality={50} // Set the quality to 50
/>
5. Loading Behavior
You can control when the image should load using the `loading` property. Options include:
- `lazy`: Load the image when it is near the viewport (default behavior).
- `eager`: Load the image immediately (useful for above-the-fold images).
<Image
    src="/images/photo.jpg"
    alt="Description of the image"
    width={500}
    height={300}
    loading="eager" // Load the image immediately
/>
By using the `next/image` component, you can automatically optimize images in your Next.js application, improving performance and user experience. Using the given configurations, a user can fully configure the appearance of images when they are rendered to be responsive, in the correct size, and fading in properly. This integrated optimization tool helps to keep the quality of displayed images high and the application’s performance high at the same time.
Testing the Migrated Application
Once you have moved your application to Next, you may not need any additional code to run in the background to schedule tasks in the application. If you are using javascript js, then you need to take extra care and ensure that the functionality is well tested and it works perfectly in any browser or on any device that is used to access the website. Here's how you can test the migrated application:
Running the Next.js Development Server
To run the Next.js development server and check for functionality, follow these steps:
1. Start the development server:
```bash
npm run dev```
2. Open your browser and navigate to `http://localhost:3000`. You should see your Next.js application running.
3. Interact with your application and verify that all pages, components, and functionality work as expected.
4. Check for any console errors or warnings in your browser's developer tools.
Performing Cross-Browser and Device Testing
To ensure your application works consistently across different browsers and devices, follow these best practices:
1. Test on multiple browsers:
- Test your application on popular browsers like Google Chrome, Mozilla Firefox, Safari, and Microsoft Edge.
- Use browser developer tools to simulate different device viewports and test responsiveness.
2. Test on different devices:
- Test your application on various devices, including desktops, tablets, and smartphones.
- Use real devices if possible, as emulators and simulators may not always accurately represent actual device behaviour.
3. Test on different operating systems:
- Test your application on Windows, macOS, and different versions of iOS and Android.
- If you are on past versions, upgrade to macOS Tahoe and test on that as well. If you feel like your Mac is slow while using macOS Tahoe, then use CleanMyMac diagnostics for slow Mac.
4. Test on different network conditions:
- Test your application under different network conditions, such as slow internet speeds or intermittent connectivity.
- Use browser developer tools to simulate different network throttling scenarios.
5. Test accessibility:
- Ensure your application is accessible to users with disabilities by testing with screen readers and other assistive technologies.
- Use tools like Lighthouse or axe to perform automated accessibility checks.
6. Test for performance:
- Use tools like Lighthouse or PageSpeed Insights to measure your application's performance and identify areas for improvement.
- Test your application's loading speed and ensure it meets your performance goals.
7. Test for SEO:
- Verify that your application's pages are properly indexed by search engines.
- Use tools like Google Search Console or Bing Webmaster Tools to check for any indexing or crawling issues.
8. Test for security:
- Ensure your application is secure by testing for common vulnerabilities like cross-site scripting (XSS), cross-site request forgery (CSRF), and SQL injection.
- Use tools like OWASP ZAP or Burp Suite to perform security scans.
With these testing practices in mind, you can guarantee that migrated Next can efficiently and effectively perform its functions. In practice, the js application behaves uniformly across different browsers, devices, and surroundings to offer the intended user experience and fulfil the needs of your application.
Deployment of the Next.js Application
When deploying a Next.js application, it's important to choose a hosting platform that is optimized for Next.js and provides features that enhance the performance and scalability of your application. Two popular hosting options for Next.js are Vercel and Netlify.
Vercel
Vercel, the creators of Next.js, provide a managed hosting platform that is optimized for Next.js applications. Deploying to Vercel is straightforward and requires minimal configuration.
Deployment Steps on Vercel
- Sign up for a Vercel account or log in to your existing account.
- Import your Next.js project repository from GitHub, GitLab, or Bitbucket.
- Configure your project settings if needed, such as environment variables or build commands.
- Deploy your application by clicking the "Deploy" button.
Vercel automatically builds and deploys your Next.js application, ensuring that all features are supported and optimized for performance.
Netlify
Another hosting platform that is quite popular and offers great support for Next. js applications. is Netlify. It includes features such as automatic builds, serverless functions, and a global content delivery network (CDN).
Deployment Steps on Netlify
- Sign up for a Netlify account or log in to your existing account.
- Connect your Next.js project repository from GitHub, GitLab, or Bitbucket.
- Configure your build settings in the Netlify dashboard, including the build command and output directory.
- Deploy your application by clicking the "Deploy site" button.
Netlify will automatically build and deploy your Next.js application, optimizing it for performance and providing features like automatic HTTPS and form handling.
Best Practices for Deployment
Here are some best practices to keep in mind when deploying a Next.js application:
- Use environment variables to store sensitive information like API keys or database credentials.
- Optimize your images using the `next/image` component to ensure fast loading times.
- Implement code splitting to split your application's code into smaller chunks, improving initial load times.
- Use Incremental Static Regeneration (ISR) to revalidate static pages at runtime without rebuilding the entire application.
- Set up monitoring and logging to track your application's performance and identify any issues.
- Regularly update your dependencies to ensure your application is secure and takes advantage of the latest features and bug fixes.
By following these best practices and leveraging the features of hosting platforms like Vercel and Netlify, you can ensure that your Next.js application is deployed efficiently and provides an optimal user experience.
Best Practices for Migration
When migrating an application to Next.js, adhering to best practices can significantly enhance the application's maintainability, performance, and user experience. Here are a few guidelines for migration specifically for modularity, error boundaries, internationalization and hybrid rendering.
Modularization
Encouraging the breakdown of components into smaller, reusable pieces is essential for creating a modular application. Modularization promotes better organization, easier testing, and improved reusability of code.
Benefits of Modularization
- Reusability: Smaller components can be reused across different parts of the application, reducing duplication.
- Maintainability: Isolated components are easier to update and debug.
- Clarity: Modular code enhances readability, making it easier for developers to understand the structure and purpose of each component.
Best Practices for Modularization
- Single Responsibility Principle: Each component should have a single responsibility, making it easier to manage.
- Consistent Naming Conventions: Use clear and consistent naming for components to improve discoverability.
- Encapsulation: Keep component logic self-contained to reduce dependencies on other parts of the application.
Error Boundaries
Implementing error boundaries is crucial for better error handling in React applications, including those built with Next.js. Error boundaries are used to capture JavaScript errors in components and their subtree and log the error so that the application can render a fallback user interface instead of failing.
How to Implement Error Boundaries
1. Create an Error Boundary Component:
   import React from 'react';

   class ErrorBoundary extends React.Component {
       constructor(props) {
           super(props);
           this.state = { hasError: false };
       }

       static getDerivedStateFromError(error) {
           return { hasError: true };
       }

       componentDidCatch(error, errorInfo) {
           console.error("Error caught in Error Boundary:", error, errorInfo);
       }

       render() {
           if (this.state.hasError) {
               return <h1>Something went wrong.</h1>;
           }

           return this.props.children;
       }
   }

   export default ErrorBoundary;
2. Wrap Components with the Error Boundary:
   import ErrorBoundary from './ErrorBoundary';

   const App = () => (
       <ErrorBoundary>
           <MyComponent />
       </ErrorBoundary>
   );
Benefits of Error Boundaries
- Graceful Degradation: Users can still interact with parts of the application that are functioning correctly.
- Improved Debugging: Errors are logged, making it easier to track down issues.
Internationalization
Internationalization (i18n) is essential for making applications accessible to a global audience. It involves designing the application to support multiple languages and cultural formats.
Importance of Internationalization
- Wider Reach: Supporting multiple languages allows you to reach a broader audience.
- User Experience: Users prefer applications in their native language, enhancing engagement and satisfaction.
- Compliance: Many regions require applications to support local languages and formats.
Best Practices for Internationalization
- Use i18n Libraries: Libraries like `next-i18next` or `react-i18next` can simplify the process of adding internationalization to your Next.js application.
- Separate Content from Code: Store translations in separate files to keep your code clean and maintainable.
- Test Localization: Ensure that all text, images, and formats are correctly localized for different regions.
Hybrid Rendering
Next.js supports both Server-Side Rendering (SSR) and Client-Side Rendering (CSR), allowing developers to combine both methods for optimal performance.
Benefits of Hybrid Rendering
- Improved Performance: SSR can be used for pages that require up-to-date data, while CSR can be used for static pages, reducing server load.
- SEO Optimization: SSR provides fully rendered pages to search engines, improving SEO.
- Enhanced User Experience: CSR can provide a smoother experience for users interacting with dynamic content.
Implementing Hybrid Rendering
1. Use `getServerSideProps` for SSR:
   export async function getServerSideProps() {
       const data = await fetchData();
       return { props: { data } };
   }
2. Use CSR for Interactive Components:
   const MyComponent = () => {
       const [data, setData] = useState(null);

       useEffect(() => {
           fetchData().then(setData);
       }, []);

       return <div>{data ? data : "Loading..."}</div>;
   };
By strategically using SSR for critical pages and CSR for interactive components, you can enhance the overall performance and user experience of your Next.js application.
Adopting these best practices during the migration to Next.js can lead to a more maintainable, performant, and user-friendly application. To increase reliability modern web applications use such strategies as: Modularization, error boundaries, internationalization, and hybrid rendering. Through these practices, you will be able to avoid the common pitfalls that hinder your application from a wide range of users.
Also Read: Building Scalable API Integrations in ReactJS - How-to Guide
The Bottom Line
Migrating an existing React project to Next.js can be a complex process, and Index.dev can significantly streamline this transition by providing access to a pool of vetted, experienced developers. Their platform allows you to quickly hire remote tech talent with strong expertise in Next.js, ensuring that you have the right skills on your team to manage the migration effectively.
Index.dev simplifies the hiring process through a four-step approach: You specify your requirements, receive a shortlist of pre-vetted candidates, conduct interviews, and start a trial period with your chosen developer.
This efficient process not only saves time but also ensures that you find high-performing developers who can integrate seamlessly into your existing workflows. Additionally, Index.dev offers ongoing support and maintenance services, which can be invaluable after the migration is complete, allowing you to focus on scaling your application while it handles technical challenges. By leveraging Index.dev's resources, you can ensure a smooth and successful migration to Next.js.
Here's what sets Index.dev apart:
- 3x Higher Retention: Build lasting teams with developers who stay engaged.
- 97% Trial-to-Hire Conversion: Get the perfect fit with minimal risk.
- 30-Day Payback, $0 Upfront: Only pay when you find the ideal candidate.
- 3-5 Interview-Ready Matches in 48 Hours: Focus on what matters – interviewing top talent.
Looking to hire React.js developers? Index.dev connects you with the elite 5% of vetted React developers, ready to take your projects to the next level.
Are you a seasoned React developer seeking challenging projects in the US, UK, and EU? Join Index.dev and build a fulfilling remote career with top companies.
