If you’re a developer, or even just curious about how software gets built, you’ve probably heard about system design patterns.
Think of them as tried-and-true shortcuts for solving problems you’ll face again and again when making apps or systems. Instead of guessing or messing around, you lean on patterns to keep things clean and smart.
This article is your quick guide to the 14 most important system design patterns. Whether you’re just starting out or you’ve been coding for years, understanding these patterns will help you build better software faster.
I’ll keep it simple and practical with examples in different programming languages so you get how they work.
Join Index.dev today and get matched with top global companies. Use your new design pattern skills to build a remote career that scales!
What Are Design Patterns and Why Should You Care?
Design patterns are like cheat codes in programming. They’re repeatable, reusable solutions to common problems you face when designing software. Instead of inventing the wheel every time, you grab a pattern that’s already been tested by experts.
Design patterns also give you a common language to talk with other developers. When you say “Singleton” or “Observer,” others immediately get what you mean.
Design patterns help you:
- Write code that’s easier to understand and maintain
- Avoid bugs by following best practices
- Communicate better with your team because everyone speaks the same “pattern” language
There are three big families of design patterns:
- Creational Patterns: How you create objects. These patterns make object creation flexible and reusable. Think Singleton, Factory, and Builder.
- Structural Patterns: How you put objects together to build bigger things. Examples are Adapter, Decorator, and Composite.
- Behavioral Patterns: How objects talk and work together. Observer, Strategy, and Command fall here.
Enough talk! Let’s dive into the 14 most important system design patterns you should have in your toolkit.
1. Singleton Design Pattern
One and only one
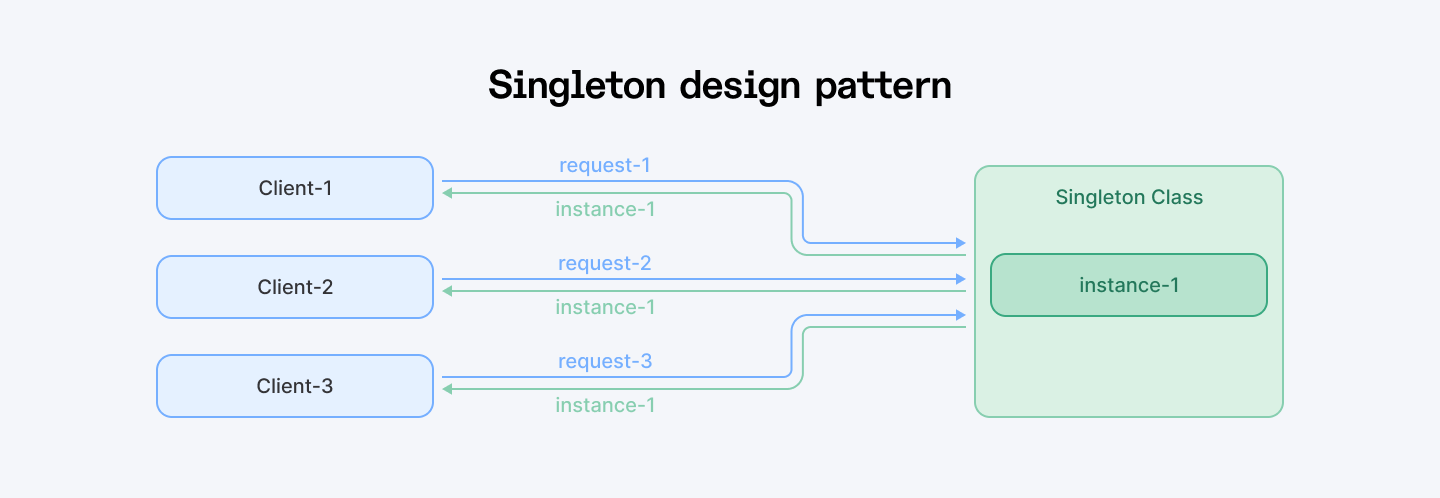
The Singleton pattern makes sure a class has only one instance (one object) in the whole program. It also gives you a way to get that single instance from anywhere in your code.
When to Use It
You'll want Singleton when you need exactly one thing managing a specific job. Here are some real-world scenarios:
- Database connections - You don't want 50 different connections eating up your resources
- Logging systems - One logger to rule them all
- Configuration settings - One place to store your app's settings
- Cache managers - One cache, shared by everyone
The Good and The Bad
Pros
- Easy to manage shared resources.
- Saves memory (you don’t keep creating the same thing over and over).
- Central control: one place to change things.
Cons
- Can be hard to unit test.
- Makes code tightly coupled (not great for flexibility).
- Can cause issues in multi-threaded apps if not handled carefully.
How to Use It?
- Make the class’s constructor private or hidden so no one can create new objects
- Keep a static or class-level variable to hold the single instance
- Provide a public method to get that instance, creating it if it doesn’t exist yet
Quick Python Example
class Singleton:
    _instance = None  # This holds the single instance

    def __new__(cls):
        if cls._instance is None:
            print("Creating the Singleton instance...")
            cls._instance = super(Singleton, cls).__new__(cls)
            # Initialize anything here if needed
        return cls._instance

# Usage
s1 = Singleton()
s2 = Singleton()

print(s1 is s2)  # True, both are the same instance
Here’s what’s happening:
- __new__ controls object creation.
- The first time you create Singleton(), it makes the instance and saves it.
- Next times, it just returns the saved instance.
Quick Implementation Tips
- Use singletons for managing shared resources like database connections, logging, caching, or configuration settings.
- Make the constructor private or protected to prevent creating multiple instances from outside.
- Use a static method (like getInstance()) to provide a global access point to the single instance.
- Ensure thread safety if your app runs in multiple threads: use locks, double-checked locking, or language-specific thread-safe features.
- Consider using eager initialization if your singleton is lightweight and you want to avoid synchronization overhead.
- Use enum-based singletons (in languages like Java) for the simplest, safest implementation.
- Avoid overusing singletons as they can make testing harder and introduce hidden dependencies if misused.
- When testing, consider dependency injection or mocking the singleton to keep tests isolated.
2. Factory Method Design Pattern
Tell me what you need, I’ll make it
The Factory Method pattern is all about creating objects without showing the exact class that’s being created. Instead of calling a constructor directly (new Something()), you call a factory method that decides what to make and gives it back to you.
When to Use It
Factory Method shines when you need to create different types of objects but don't want your code to be tied to specific classes.
Perfect for:
- Multiple file formats - PDFs, Excel sheets, Word docs
- Different payment methods - Credit card, PayPal, Apple Pay
- Various notification types - Email, SMS, push notifications
- Multiple database drivers - MySQL, PostgreSQL, MongoDB
The Good and The Bad
Pros
- Makes adding new object types easy without changing existing code
- Separates object creation from usage, reducing tight coupling
- Supports open/closed principle (open for extension, closed for modification)
Cons
- Adds extra classes and interfaces, which can make the code more complex
- Sometimes overkill if you only have a few object types
- Can confuse beginners with all the interfaces
How It Works
- Define a factory interface or base class with a method to create objects
- Let subclasses override this method to create specific objects
- Client code calls the factory method instead of directly using constructors
Code Example in TypeScript
// Product interface
interface Report {
  generate(): void;
}

// Concrete Products
class PDFReport implements Report {
  generate() {
    console.log("Generating PDF report...");
  }
}

class ExcelReport implements Report {
  generate() {
    console.log("Generating Excel report...");
  }
}

// Creator interface
abstract class ReportFactory {
  abstract createReport(): Report;
}

// Concrete Creators
class PDFReportFactory extends ReportFactory {
  createReport(): Report {
    return new PDFReport();
  }
}

class ExcelReportFactory extends ReportFactory {
  createReport(): Report {
    return new ExcelReport();
  }
}

// Usage
const factory: ReportFactory = new ExcelReportFactory();
const report: Report = factory.createReport();
report.generate(); // Outputs: Generating Excel report...
What’s happening here?
- You define a common interface for all reports: Report.
- Each report type (PDF, Excel) implements that interface.
- Then, you build a factory for each report type.
- The client code only talks to the factory, it doesn’t care which class is being created behind the scenes.
This makes your code easier to maintain and extend. Want to add a WordReport later? Just make a new class and factory. No need to touch the client logic.
Quick Implementation Tips
- Define a common interface or abstract class for all products your factory will create.
- Put the factory method in a creator class, returning the product interface type.
- Don’t create objects directly with new outside the factory method, always use the factory method to instantiate.
- Override the factory method in subclasses to create different product types without changing client code.
- Use factory methods to encapsulate object creation logic and keep it separate from business logic.
- Avoid big switch or if statements inside the factory method by using subclassing or registration maps if possible.
- When adding new product types, just add new subclasses and override the factory method (no changes needed in existing code).
- Keep the factory method focused on creation only; don’t mix it with other responsibilities.
3. Strategy Design Pattern
Pick the best tool for the job
The Strategy pattern is like having a toolbox full of different ways (algorithms) to do the same job. You pick the right tool (strategy) at runtime, and swap it out anytime you want. Each strategy is wrapped up in its own class, so they’re easy to switch and manage.
Think of it like choosing your route in Google Maps: fastest route, shortest distance, avoid highways, etc.
When to Use It
Strategy is perfect when you have multiple ways to do the same thing and want to choose the best approach at runtime:
- Sorting algorithms - Quick sort, merge sort, bubble sort
- Pricing calculations - Regular, discount, premium member pricing
- Data compression - ZIP, RAR, 7Z formats
- Authentication methods - OAuth, JWT, basic auth
- Image processing - Different filters and effects
- Search algorithms - Linear, binary, hash table lookup
Use this pattern for:
- A navigation app letting users pick shortest route, fastest route, or avoid tolls
- A shopping app with different payment methods like credit card, PayPal, or Bitcoin
- Calculating shipping costs with different carriers
The Good and The Bad
Pros
- Easily switch between different algorithms at runtime
- Keeps your code neat by separating algorithms from the main logic
- Makes adding new algorithms simple without touching existing code
Cons
- Adds more classes, which might feel like extra work
- Can be overkill if you only have one or two simple algorithms
- Requires knowing about all strategies up front or plugging them in dynamically
How It Works
Strategy follows a simple recipe:
- Define a strategy interface with a common method all algorithms must implement
- Create concrete strategy classes for each algorithm implementing that interface
- Have a context class that holds a reference to a strategy and uses it to perform the task
- Change the strategy object at runtime to switch algorithms
Quick Python Example
from abc import ABC, abstractmethod

# Strategy Interface
class PaymentStrategy(ABC):
    @abstractmethod
    def pay(self, amount):
        pass

# Concrete Strategies
class CreditCardPayment(PaymentStrategy):
    def pay(self, amount):
        print(f"Paid {amount} using Credit Card.")

class PayPalPayment(PaymentStrategy):
    def pay(self, amount):
        print(f"Paid {amount} using PayPal.")

class BitcoinPayment(PaymentStrategy):
    def pay(self, amount):
        print(f"Paid {amount} using Bitcoin.")

# Context
class ShoppingCart:
    def __init__(self):
        self.payment_strategy = None

    def set_payment_strategy(self, strategy):
        self.payment_strategy = strategy

    def checkout(self, amount):
        if not self.payment_strategy:
            print("Payment method not set!")
        else:
            self.payment_strategy.pay(amount)

# Usage
cart = ShoppingCart()

# User chooses PayPal
cart.set_payment_strategy(PayPalPayment())
cart.checkout(100)  # Paid 100 using PayPal.

# User switches to Credit Card
cart.set_payment_strategy(CreditCardPayment())
cart.checkout(250)  # Paid 250 using Credit Card.
What is happening here?
The ShoppingCart doesn’t care how payment is done. It just calls pay() on whatever strategy it’s given. You can swap payment methods anytime without changing the cart’s code.
Quick Implementation Tips
- Use this pattern when you have multiple ways to perform a task and want to switch between them cleanly.
- Define a common interface for all your algorithms/strategies (e.g., calculate(), execute(), sort() etc.)so they can be swapped easily.
- Keep each strategy focused on a single way of doing the task (no mixing behaviors).
- Let the client choose or switch strategies at runtime to change behavior dynamically.
- Avoid big if-else or switch statements by encapsulating each algorithm in its own class.
- Use composition: your main class holds a reference to a strategy object and delegates work to it.
- Keep strategy objects stateless if possible, so they’re easy to reuse and test.
- When adding new algorithms, just add new strategy classes (no changes to existing code).
4. Observer Design Pattern
I'll let you know when something changes
The Observer pattern is like a subscription service. You have one main object (called the subject) that keeps a list of subscribers (called observers). When the subject changes, it automatically notifies all its observers so they can update themselves.
Think of it like following someone on Twitter. When they tweet, you see the update. You don’t ask every second if they posted, they just push it to you.
When to Use It
Observer is perfect when you have one thing that many other things need to know about:
- News feeds - New articles notify all subscribers
- Stock price updates - Traders, apps, and displays all get updated
- User interface - Button clicks update multiple UI components
- Shopping cart - Price changes update total, tax, shipping
- Game events - Player death notifies scoreboard, achievements, sound effects
- Model-View architectures - Data changes update all views
Use this pattern for:
- A news app sending breaking news to all subscribers
- UI components updating when data changes
The Good and The Bad
Pros
- Loose coupling between subject and observers
- Easy to add or remove observers dynamically
- Supports event-driven programming
- Real-time updates, changes happen immediately
Cons
- Can cause memory leaks if observers aren't properly removed
- Hard to debug, cascade of updates can be confusing
- Can get complicated if too many observers are involved
- Observers might get updates in unpredictable order
How It Works
- Define an observer interface with an update method
- Create concrete observer classes implementing that interface
- Create a subject class that keeps a list of observers and notifies them when something changes
- Observers register themselves with the subject to receive updates
Code Example in JavaScript
// Subject (WeatherStation)
class WeatherStation {
  constructor() {
    this.observers = [];
    this.temperature = null;
  }

  addObserver(observer) {
    this.observers.push(observer);
  }

  removeObserver(observer) {
    this.observers = this.observers.filter(obs => obs !== observer);
  }

  setTemperature(temp) {
    console.log(`WeatherStation: new temperature is ${temp}°C`);
    this.temperature = temp;
    this.notifyObservers();
  }

  notifyObservers() {
    this.observers.forEach(observer => observer.update(this.temperature));
  }
}

// Observer (Display)
class TemperatureDisplay {
  update(temp) {
    console.log(`TemperatureDisplay: Updated temperature is ${temp}°C`);
  }
}

class HumidityDisplay {
  update(temp) {
    console.log(`HumidityDisplay: Assuming related humidity... (still showing temp: ${temp}°C)`);
  }
}

// Usage
const weatherStation = new WeatherStation();
const tempDisplay = new TemperatureDisplay();
const humidityDisplay = new HumidityDisplay();

weatherStation.addObserver(tempDisplay);
weatherStation.addObserver(humidityDisplay);

// Simulate a change in weather
weatherStation.setTemperature(26);
weatherStation.setTemperature(30);
What’s going on here:
- WeatherStation is the subject. It keeps a list of observers and notifies them when something changes.
- TemperatureDisplay and HumidityDisplay are observers. They each handle the update in their own way.
- You can add or remove observers on the fly without changing the subject.
Quick Implementation Tips
- Use it when you want to keep multiple parts of your app updated automatically when something changes.
- Define a clear subject (observable) interface with methods to add, remove, and notify observers.
- Keep the list of observers dynamic: allow them to subscribe or unsubscribe anytime.
- Make sure observers implement a common update method to receive notifications.
- Keep the Subject and Observers loosely coupled (they only know about each other through interfaces).
- Avoid pushing too much logic into the Subject; just notify observers and let them handle updates.
- Consider thread safety when notifying observers in multi-threaded environments.
- Watch out for potential memory leaks, especially if observers aren’t properly removed.
5. Adapter Design Pattern
Making the plug fit the socket
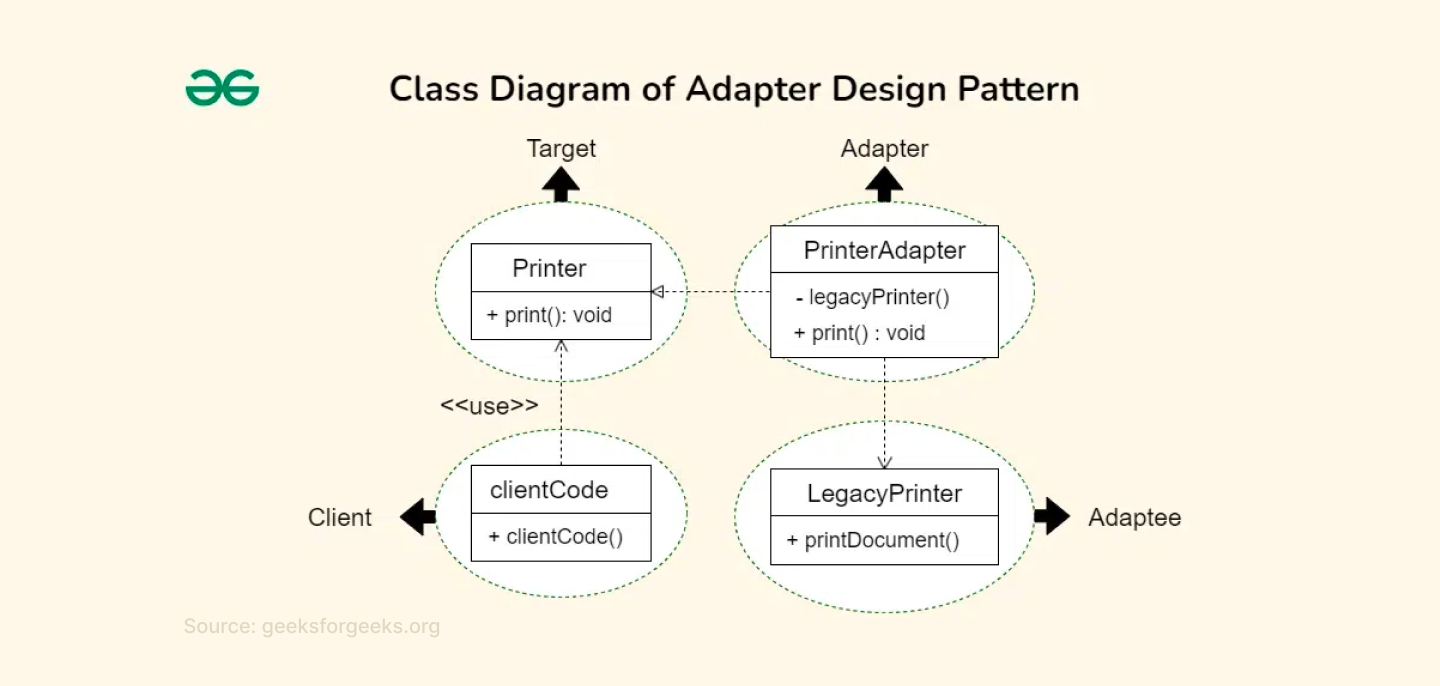
The Adapter Pattern lets you connect stuff that wasn’t designed to work together. It wraps an existing class (that doesn’t match what your code expects) and makes it behave like it does.
When to Use It
Adapter is perfect when you have existing code that works great, but you need to make it play nice with something new:
- Third-party libraries - Integrating external APIs with different interfaces
- Legacy systems - Making old code work with new frameworks
- File format conversions - Reading different data formats with one interface
- Database adapters - Same operations, different database systems
- Payment gateways - Different providers, same checkout process
- Social media APIs - Twitter, Facebook, Instagram all have different APIs
Use this when:
- You need to integrate legacy code into a modern system.
- You want to recycle code without touching or rewriting it.
The Good and The Bad
Pros
- Makes incompatible interfaces work together
- Promotes reuse of existing code without modification
- Keeps client code clean and consistent
Cons
- Adds an extra layer of code (the adapter)
- Can get messy if you have many adapters or very complex conversions
- Can slow down performance slightly
How It Works
Adapter has three main players:
- Target: the interface your client expects
- Adaptee: the existing class that needs adapting
- Adapter: the middleman that makes them work together
The adapter implements the target interface but delegates the real work to the adaptee, translating calls as needed.
Quick Python Example
# Existing class with incompatible interface
class OldAudioPlayer:
    def play_ogg_file(self, filename):
        print(f"Playing OGG file: {filename}")

# Target interface expected by the client
class MediaPlayer:
    def play(self, filename):
        pass

# Adapter class that makes OldAudioPlayer compatible with MediaPlayer
class OggAdapter(MediaPlayer):
    def __init__(self, old_player):
        self.old_player = old_player

    def play(self, filename):
        # Translate the call to the adaptee's method
        self.old_player.play_ogg_file(filename)

# Client code
def play_audio(player, filename):
    player.play(filename)

# Usage
old_player = OldAudioPlayer()
adapter = OggAdapter(old_player)

play_audio(adapter, "song.ogg")  # Playing OGG file: song.ogg
Here’s the scoop:
The client expects a play() method, but the old player only knows play_ogg_file(). The adapter bridges this gap by translating the call, so the client can use the old player without knowing about its weird interface.
Quick Implementation Tips
- Use it when you need to make two incompatible interfaces work together without changing their code.
- Identify the incompatible interfaces you need to connect: the client’s expected interface and the existing class’s interface.
- Create an Adapter class that implements the client’s interface and holds a reference to the existing class (the adaptee).
- In the Adapter, translate or map client calls into calls the adaptee understands.
- Keep the adapter focused on just converting interfaces, not adding extra logic.
- Use composition (holding an instance of the adaptee) rather than inheritance for better flexibility.
- Use Adapter to integrate legacy systems or third-party libraries smoothly.
- Make sure the client interacts only with the Adapter, unaware of the adaptee’s details.
6. Decorator Design Pattern
Wrap it up with more features
The Decorator Pattern lets you add new behavior to an object dynamically, without changing its structure or using inheritance. It wraps the original object in a new "decorator" class that adds extra responsibilities.
When to Use It
You'll love this pattern when:
- You need to add features to existing objects.
- Creating tons of subclasses would be a nightmare.
- You want to combine different features flexibly.
- You're working with legacy code you can't modify.
Perfect for things like adding middleware to web requests, strengthening UI components, or building data processing pipelines.
The Good and The Bad
Pros
- Add features without touching existing code
- Mix and match features like building blocks
- Easy to remove features later
- Follows the "open-closed principle" (open for extension, closed for modification)
Cons
- Can create lots of small wrapper classes
- Debugging can become harder as layers of decorators stack up
- Your code might look more complex at first glance
How It Works
- Define a component interface with the core methods
- Have a concrete component class that implements this interface
- Create an abstract decorator class that also implements the interface and holds a reference to a component
- Make concrete decorators that extend the decorator class and add extra behavior before or after delegating to the wrapped object
Quick JavaScript Example
// Component Interface
class Coffee {
  cost() {
    return 0;
  }
}

// Concrete Component
class SimpleCoffee extends Coffee {
  cost() {
    return 5;
  }
}

// Decorator Abstract Class
class CoffeeDecorator extends Coffee {
  constructor(coffee) {
    super();
    this.coffee = coffee;
  }

  cost() {
    return this.coffee.cost();
  }
}

// Concrete Decorators
class MilkDecorator extends CoffeeDecorator {
  cost() {
    return super.cost() + 2; // Add milk cost
  }
}

class SugarDecorator extends CoffeeDecorator {
  cost() {
    return super.cost() + 1; // Add sugar cost
  }
}

// Usage
let myCoffee = new SimpleCoffee();
console.log(myCoffee.cost()); // 5

myCoffee = new MilkDecorator(myCoffee);
console.log(myCoffee.cost()); // 7

myCoffee = new SugarDecorator(myCoffee);
console.log(myCoffee.cost()); // 8
Here’s the deal:
You start with a simple coffee costing 5 bucks. Then you wrap it with milk, which adds 2 bucks, and then with sugar, which adds 1 more.
Each decorator adds its own flavor without changing the original coffee class.
Quick Implementation Tips
- Use it when you want to add features to an object dynamically without changing its original code.
- Always start by defining a common interface for both the core component and decorators. This keeps everything interchangeable.
- Create a base decorator class that holds a reference to the component and delegates calls to it.
- Build concrete decorators by extending the base decorator and adding extra behavior before or after delegating.
- Stack decorators by wrapping one decorator around another to combine multiple behaviors dynamically.
- Keep each decorator focused on a single responsibility to avoid messy, hard-to-maintain code.
- Design decorators to work independently of order, or clearly document when order matters.
- Avoid putting core business logic inside decorators; they should only add or modify behavior transparently.
- When testing, test decorators individually and in combination to ensure they play nicely together.
7. Command Pattern
Turn requests into objects
The Command pattern wraps actions (like clicking a button or saving a file) into objects. Instead of calling methods directly, you create command objects that know how to execute specific actions. It's like having a remote control where each button is a command object.
When to Use It
Use this pattern when you want to:
- Implement undo/redo functionality
- Queue operations for later execution
- Log user actions for debugging
- Create macro commands (combine multiple actions)
- Decouple the thing that triggers an action from the thing that performs it
Think GUI applications, task schedulers, or any system where you want to treat actions as first-class objects.
The Good and The Bad
Pros
- Clean separation between sender and receiver
- Easy to add new commands without changing existing code
- Supports complex features like undo, redo, and request queuing
Cons
- Creates lots of small command classes
- Can feel like overkill for simple operations
- More objects to manage in memory
How It Works
- Define a Command interface with an execute() method
- Create ConcreteCommand classes implementing this interface, each tied to a Receiver object that does the actual work
- The Invoker holds a command and calls its execute() method
- The Client creates commands and sets them on the Invoker
Quick JavaScript Example
// Receiver: knows how to perform the action
class Light {
  turnOn() {
    console.log("The light is ON");
  }
  turnOff() {
    console.log("The light is OFF");
  }
}

// Command Interface
class Command {
  execute() {}
}

// Concrete Commands
class TurnOnCommand extends Command {
  constructor(light) {
    super();
    this.light = light;
  }
  execute() {
    this.light.turnOn();
  }
}

class TurnOffCommand extends Command {
  constructor(light) {
    super();
    this.light = light;
  }
  execute() {
    this.light.turnOff();
  }
}

// Invoker: asks the command to carry out the request
class RemoteControl {
  setCommand(command) {
    this.command = command;
  }
  pressButton() {
    this.command.execute();
  }
}

// Client code
const light = new Light();
const turnOn = new TurnOnCommand(light);
const turnOff = new TurnOffCommand(light);

const remote = new RemoteControl();

remote.setCommand(turnOn);
remote.pressButton(); // The light is ON

remote.setCommand(turnOff);
remote.pressButton(); // The light is OFF
The RemoteControl doesn’t know how the light works. It just calls execute() on whatever command it’s given. The TurnOnCommand and TurnOffCommand know exactly what to do with the Light. This clean separation makes your code easy to extend and maintain.
Quick Implementation Tips
- Keep your Command interface simple (usually just one method like execute()).
- Separate the command logic from the invoker and receiver to keep things clean.
- Use commands to support undo/redo by adding an undo() method if needed.
- Group related commands in packages or namespaces for better organization.
- When queuing commands, consider thread safety if your app is multi-threaded.
- Use commands to log or audit actions easily by intercepting execute() calls.
- Keep commands focused on a single action to avoid messy code.
- Use this pattern when you want to decouple request senders from receivers.
8. Builder Design Pattern
Building complex things step by step
The Builder pattern helps you create complex objects step-by-step. Instead of having one giant constructor with tons of parameters, you build the object piece by piece. This way, you can create different versions of the object using the same process.
When to Use It
Use this pattern when:
- Your object has lots of optional parts or configurations
- You want to keep object construction code clean and easy to understand
- You want to create different variations of an object without repeating code
Perfect for configuration objects, complex forms, or anything that feels like you're playing 20 questions just to create it.
The Good and The Bad
Pros
- Super readable code, you know exactly what you're setting
- Easy to add new optional parameters without breaking existing code
- Can enforce required fields before building
- Different builders can create completely different objects using the same steps
Cons
- Adds extra builder classes (builders, directors)
- More code to write upfront
- Slightly more boilerplate, especially for simple objects.
How It Works
- Create a builder class (usually inside your main class)
- Add methods for each property you want to set
- Each method returns the builder itself (for method chaining)
- Add a build() method that creates and returns the final object
- Optionally add validation in the build method
Quick JavaScript Example
// Product class
class Pizza {
  constructor(crust, sauce, cheese, toppings) {
    this.crust = crust;
    this.sauce = sauce;
    this.cheese = cheese;
    this.toppings = toppings;
  }

  describe() {
    console.log(`Pizza with ${this.crust} crust, ${this.sauce} sauce, ${this.cheese} cheese, and toppings: ${this.toppings.join(", ")}`);
  }
}

// Builder class
class PizzaBuilder {
  constructor() {
    this.crust = "regular";
    this.sauce = "tomato";
    this.cheese = "mozzarella";
    this.toppings = [];
  }

  setCrust(crust) {
    this.crust = crust;
    return this; // for chaining
  }

  setSauce(sauce) {
    this.sauce = sauce;
    return this;
  }

  setCheese(cheese) {
    this.cheese = cheese;
    return this;
  }

  addTopping(topping) {
    this.toppings.push(topping);
    return this;
  }

  build() {
    return new Pizza(this.crust, this.sauce, this.cheese, this.toppings);
  }
}

// Usage
const myPizza = new PizzaBuilder()
  .setCrust("thin")
  .setSauce("pesto")
  .setCheese("goat cheese")
  .addTopping("mushrooms")
  .addTopping("olives")
  .build();

myPizza.describe();
// Pizza with thin crust, pesto sauce, goat cheese cheese, and toppings: mushrooms, olives
Instead of one huge constructor, the PizzaBuilder lets you pick and choose parts of your pizza. You chain calls to set crust, sauce, cheese, and toppings. When you’re done, build() creates the pizza object.
Quick Implementation Tips
- Use it when your object has lots of optional parameters. It keeps constructors clean and readable.
- Use a separate Builder class to handle these steps. Keep it focused on building only.
- Chain your builder methods for a fluent, readable setup (.setName().setSize().addTopping() style).
- Avoid constructors with tons of parameters; use builder to set only what you need.
- Clearly separate mandatory and optional fields; consider enforcing mandatory ones at compile time if possible.
- Keep the final product immutable by making fields final or read-only after build.
- Use a Director class if you want to standardize common build sequences, but it’s optional.
- In languages like Java, use static builder methods to start building with required fields, making the API easier and safer to use.
- Avoid using the Builder pattern for simple objects.
9. Facade Design Pattern
Simplify the complex
The Facade Pattern provides a unified, simplified interface to a set of interfaces in a subsystem. It helps clients use the system without needing to understand its internal complexity.
When to Use It
This pattern is your best friend when:
- You're working with a complex library or API that has tons of classes and methods
- Your clients don't need to know about all the internal complexity
- You want to provide a simplified entry point to a complicated system
- You're integrating multiple subsystems and want one clean interface
- You want to reduce dependencies between client code and subsystems
Perfect for wrapping third-party libraries, creating unified APIs, or simplifying complex business logic.
The Good and The Bad
Pros
- Simplifies complex systems for clients
- Reduces coupling between clients and subsystems
- Makes the codebase cleaner and easier to maintain
- Great for creating different levels of complexity (simple facade for basic users, direct access for power users)
Cons
- Can become a "god object" if you're not careful
- May hide necessary functionality if overly simplified
- One more layer of abstraction to maintain
- Could become a bottleneck if not designed well
How It Works
- Create a facade class that contains references to all the subsystem objects
- Implement simple, high-level methods in the facade
- These methods coordinate calls to multiple subsystem components
- Clients only interact with the facade, never directly with subsystems
Quick Python Example
# Subsystems
class LightSystem:
    def turn_on(self):
        print("Lights are ON")

    def turn_off(self):
        print("Lights are OFF")

class HeatingSystem:
    def set_temperature(self, temp):
        print(f"Heating set to {temp}°C")

class SecuritySystem:
    def arm(self):
        print("Security system armed")

    def disarm(self):
        print("Security system disarmed")

# Facade
class HomeAutomationFacade:
    def __init__(self):
        self.lights = LightSystem()
        self.heating = HeatingSystem()
        self.security = SecuritySystem()

    def morning_routine(self):
        print("Starting morning routine...")
        self.lights.turn_on()
        self.heating.set_temperature(22)
        self.security.disarm()

    def night_mode(self):
        print("Starting night mode...")
        self.lights.turn_off()
        self.heating.set_temperature(18)
        self.security.arm()

# Client code
home = HomeAutomationFacade()

home.morning_routine()
# Starting morning routine...
# Lights are ON
# Heating set to 22°C
# Security system disarmed

home.night_mode()
# Starting night mode...
# Lights are OFF
# Heating set to 18°C
# Security system armed
Here’s the deal:
Instead of juggling all the individual systems yourself, you just call morning_routine() or night_mode() on the Facade. It takes care of the details, so you get a simple, clean interface.
Quick Implementation Tips
- Create a single Facade class that wraps all complex subsystem calls.
- Keep the Facade interface simple and focused on common client needs.
- Let the Facade handle subsystem initialization and lifecycle management.
- Avoid exposing subsystem details to the client (keep them hidden behind the Facade).
- If the Facade gets too big, split it into smaller, focused facades for different subsystem parts.
- Use Facade to reduce dependencies between subsystems by forcing communication through it.
- Use Facade to create clear entry points for layered or modular systems.
- Don’t overuse Facade in simple systems; it’s meant to tame complexity, not add unnecessary layers.
10. Composite Design Pattern
Treat part and whole the same
The Composite Pattern lets you compose objects into tree structures to represent part-whole hierarchies. It allows clients to treat individual objects and groups of objects uniformly.
When to Use It
Use this pattern when:
- You have a part-whole hierarchy (like files and folders, menus, GUI elements, or organizational charts)
- You want to treat single objects and groups of objects uniformly
- You want to simplify client code by avoiding lots of type checks or special cases
The Good and The Bad
Pros
- Simplifies client code by providing a uniform interface
- Makes it easy to build and manage complex tree structures
- Promotes uniformity in operations across leaf and composite nodes
Cons
- Can make design more complex if overused
- Sometimes clients need to know if they’re dealing with a leaf or composite, which can break transparency
How to Use It
- Define a common interface (Component) for both leaves and composites
- Implement leaf classes that do the actual work
- Implement composite classes that hold children and forward operations to them
- Client interacts with components through the common interface
Code Example in Python
from abc import ABC, abstractmethod

# Component Interface
class FileSystemComponent(ABC):
    @abstractmethod
    def show_details(self, indent=0):
        pass

# Leaf
class File(FileSystemComponent):
    def __init__(self, name, size):
        self.name = name
        self.size = size

    def show_details(self, indent=0):
        print('  ' * indent + f"File: {self.name} (Size: {self.size} KB)")

# Composite
class Directory(FileSystemComponent):
    def __init__(self, name):
        self.name = name
        self.children = []

    def add(self, component):
        self.children.append(component)

    def show_details(self, indent=0):
        print('  ' * indent + f"Directory: {self.name}")
        for child in self.children:
            child.show_details(indent + 1)

# Usage
root = Directory("root")
file1 = File("file1.txt", 10)
file2 = File("file2.txt", 20)

subdir = Directory("subdir")
file3 = File("file3.txt", 30)

root.add(file1)
root.add(subdir)
subdir.add(file2)
subdir.add(file3)

root.show_details()

Output:
text
Directory: root
  File: file1.txt (Size: 10 KB)
  Directory: subdir
    File: file2.txt (Size: 20 KB)
    File: file3.txt (Size: 30 KB)
Here’s the deal:
Whether it’s a single file or a whole directory full of files and folders, you call show_details() the same way. The composite (Directory) forwards the call to its children, so the whole tree gets printed nicely.
Quick Implementation Tips
- Make sure your system naturally fits a tree-like structure with parts and wholes.
- Define a common interface for both simple (leaf) and complex (composite) objects.
- Keep your leaf classes focused on individual object behavior.
- Composite classes should store children and delegate operations to them recursively.
- Provide methods in composites to add, remove, or manage child components dynamically.
- Use recursion carefully: composite methods often call the same method on children.
- Avoid adding operations that don’t make sense for all components; it can break the pattern’s uniformity.
- Watch out for unnecessary complexity if your hierarchy is shallow or simple (don’t over-engineer).
- In languages like JavaScript, use arrays or lists to hold children and loop through them in composite methods.
11. State Design Pattern
Allow an object to change its behavior when its internal state changes
The State pattern lets an object change its behavior when its internal state changes. It’s like the object changes its class without actually changing its class. Instead, it delegates behavior to different state objects.
When to Use It
Use this pattern when:
- An object’s behavior depends on its state, and it must change behavior at runtime depending on that state.
- You want to avoid large conditional statements that check the object's state and execute different behaviors.
Some real-world examples include:
- A TCP connection object can change its behavior based on the connection state (e.g., Listening, Established, Closed).
- UI buttons that change behavior and appearance depending on application state (e.g., Enabled, Disabled, Hovered).
The Good and The Bad
Pros
- Simplifies complex conditional logic by delegating to state objects
- Improves maintainability and scalability by encapsulating state-specific behavior
- Allows easy addition of new states without changing the context class
Cons
- Increases the number of classes in the system
- Clients must be aware of state transitions
How to Use It
- Define a State interface with methods for actions
- Create concrete State classes implementing these methods for each state
- The Context class holds a reference to the current State and delegates requests to it
- The Context can change its current State dynamically
Quick Python Example
from abc import ABC, abstractmethod

# State interface
class State(ABC):
    @abstractmethod
    def handle(self, context):
        pass

# Concrete States
class RedState(State):
    def handle(self, context):
        print("Red light - STOP")
        context.state = GreenState()  # Change to next state

class GreenState(State):
    def handle(self, context):
        print("Green light - GO")
        context.state = YellowState()  # Change to next state

class YellowState(State):
    def handle(self, context):
        print("Yellow light - SLOW DOWN")
        context.state = RedState()  # Change to next state

# Context
class TrafficLight:
    def __init__(self):
        self.state = RedState()  # Initial state

    def change(self):
        self.state.handle(self)

# Usage
traffic_light = TrafficLight()

for _ in range(6):
    traffic_light.change()

Output:
text
Red light - STOP
Green light - GO
Yellow light - SLOW DOWN
Red light - STOP
Green light - GO
Yellow light - SLOW DOWN
The TrafficLight delegates its behavior to the current state object. Each state knows what to do and which state comes next. The light changes its behavior simply by switching its state object.
Quick Implementation Tips
- Define a clear State interface that all concrete states implement. Keep methods relevant to all states.
- Create separate state classes for each behavior your object can have. Avoid mixing state logic in one class.
- Let the Context hold a reference to the current state and delegate state-specific behavior to it.
- Allow states to change the Context’s state by setting a new state object inside state methods.
- Avoid big if-else or switch blocks by moving conditional logic into state classes.
- Use back-references from states to the context if they need to trigger transitions or access context data.
- Keep state transitions explicit and easy to follow for better maintainability.
- When adding new states, just create new classes; no need to change existing code (follow the Open/Closed Principle).
12. Proxy Design Pattern
Control access to an object by providing a surrogate

Proxy pattern is basically a middleman that controls access to another object. Instead of talking directly to the real object, you talk to the proxy first. The proxy then decides what to do - maybe it'll pass your request along, or maybe it'll handle it itself.
When to Use It
Use this pattern:
- To delay the creation and loading of an expensive object until it’s actually needed (lazy initialization)
- To provide controlled access (e.g., security proxy)
- To represent a remote object locally (e.g., Remote Proxy)
- To add logging, caching, or other functionality transparently
Real examples include:
- Virtual Proxy: Delaying loading of large images or files until they’re needed.
- Protection Proxy: Controlling access to a sensitive resource based on user permissions.
- Remote Proxy: Local representation of a remote service in distributed systems.
The Good and The Bad
Pros
- You can add security, logging, or caching without touching the original code
- Makes your app faster by delaying expensive operations
- Keeps things organized by separating concerns
Cons
- Adds an additional layer, which might complicate debugging
- Might slow things down if the proxy does too much
How It Works
Here's the game plan:
- Create an interface that both your real object and proxy will follow
- Build your proxy class that implements this interface
- Make the proxy hold a reference to the real object
- Let the proxy decide when and how to call the real object
Simple Python Example
Let’s say you have a super high-resolution image that takes a long time to load. You don’t want to load it until you really need to display it. Here’s how you’d use a proxy to handle that:
class Image:
    def __init__(self, filename):
        self.filename = filename
        self._loaded = False

    def load(self):
        if not self._loaded:
            print(f"Loading {self.filename} from disk...")
            self._loaded = True

    def display(self):
        self.load()
        print(f"Displaying {self.filename}")

class ImageProxy:
    def __init__(self, filename):
        self._real_image = None
        self.filename = filename

    def display(self):
        if self._real_image is None:
            self._real_image = Image(self.filename)
        self._real_image.display()

# Usage
image = ImageProxy("huge_photo.jpg")
print("Image created, but not loaded yet...")
image.display()  # Loads and displays the image
image.display()  # Just displays, doesn't load again
What’s happening here?
- When you create ImageProxy, it doesn’t load the image right away.
- The first time you call display(), it loads the image from disk (which might be slow), then shows it.
- The next time you call display(), it just shows the image, no need to load it again.
- The proxy controls when the real image is loaded, saving time and resources.
Quick Implementation Tips
- Use it when you want to control access to another object, like adding security, lazy loading, caching, or logging.
- Make sure your proxy and real object share the same interface so clients can’t tell them apart.
- Use lazy initialization (virtual proxy) to delay creating heavy objects until they’re actually needed.
- Apply protection proxies to control who can access sensitive operations or data.
- Consider smart proxies to add extra features like caching, logging, or reference counting.
- Keep the proxy lightweight; it should only add control, not heavy logic.
- Use proxies to simplify access to remote or complex resources by hiding complexity behind a simple interface.
- When implementing, forward calls from the proxy to the real object, adding checks or extra steps before or after as needed.
- Avoid making proxies do too much (their job is to control access, not replace the real object’s core responsibilities).
13. MVC (Model-View-Controller) Design Pattern
MVC is an architectural pattern that separates an application into three main components:
- Model: Represents the application data and business logic. It directly manages the data, rules, and logic.
- View: The user interface, displaying the data from the model to the user.
- Controller: Acts as an intermediary between the Model and the View. It handles user input, manipulates the model, and updates the view accordingly.
When to Use It
You'll love MVC when:
- When building apps with user interfaces, especially web apps
- When you want to separate data handling from UI and user input
- When working in teams, so front-end and back-end work can happen independently
The Good and Bad
Pros
- Clear separation of concerns (everyone has their lane and stays in it)
- You can test business logic without worrying about UI stuff
- Supports parallel development (frontend devs work on Views, backend devs work on Models)
Cons
- Can increase complexity for simple applications
- Takes time to understand how all three pieces talk to each other
- Instead of one big file, now you've got three (or more)
How It Works (Simple Flow)
- The user interacts with the View (e.g., clicks a button).
- The Controller processes input and updates the Model.
- The Model notifies the View about data changes, and the View refreshes the UI.
Code Example in JavaScript
Let's build a tiny blog where you can add and view posts. Here's how it looks in JavaScript:
// MODEL - Handles data and business logic
class BlogModel {
    constructor() {
        this.posts = [];
    }

    addPost(title, content) {
        const post = {
            id: Date.now(), // Simple ID
            title: title,
            content: content,
            createdAt: new Date()
        };
        this.posts.push(post);
        return post;
    }

    getAllPosts() {
        return this.posts;
    }
}

// VIEW - Handles what the user sees
class BlogView {
    displayPosts(posts) {
        const container = document.getElementById('posts-container');
        container.innerHTML = ''; // Clear existing posts

        posts.forEach(post => {
            const postDiv = document.createElement('div');
            postDiv.innerHTML = `
                <h3>${post.title}</h3>
                <p>${post.content}</p>
                <small>Posted: ${post.createdAt.toLocaleDateString()}</small>
                <hr>
            `;
            container.appendChild(postDiv);
        });
    }

    showMessage(message) {
        alert(message); // Simple feedback
    }
}

// CONTROLLER - The middleman who makes things happen
class BlogController {
    constructor(model, view) {
        this.model = model;
        this.view = view;
        this.init();
    }

    init() {
        // Set up event listeners
        document.getElementById('add-post-btn').addEventListener('click', () => {
            this.handleAddPost();
        });

        // Show existing posts
        this.updateView();
    }

    handleAddPost() {
        const title = document.getElementById('post-title').value;
        const content = document.getElementById('post-content').value;

        if (title && content) {
            this.model.addPost(title, content);
            this.view.showMessage('Post added successfully!');
            this.updateView();
            this.clearForm();
        } else {
            this.view.showMessage('Please fill in both title and content!');
        }
    }

    updateView() {
        const posts = this.model.getAllPosts();
        this.view.displayPosts(posts);
    }

    clearForm() {
        document.getElementById('post-title').value = '';
        document.getElementById('post-content').value = '';
    }
}

// Put it all together
const model = new BlogModel();
const view = new BlogView();
const controller = new BlogController(model, view);
What's happening here?
The user types in a blog post and clicks "Add Post." The Controller grabs that info, tells the Model to save it, then asks the View to update what's shown on screen. Each piece does its own thing - the Model doesn't care about HTML, the View doesn't care about where data comes from, and the Controller just plays matchmaker.
Quick Implementation Tips
- Clearly separate your app into three parts: Model (data & logic), View (UI), and Controller (handles input and coordinates).
- Keep your Model independent: it shouldn’t know about Views or Controllers. This makes testing and reuse easier.
- Controllers should be thin: focus on handling user input and updating Models and Views, but avoid heavy business logic. Push that into the Model.
- Design Views to be as simple as possible: only display data and forward user actions to the Controller.
- Use data binding or templating engines (like Razor, Thymeleaf, or JSX) to keep Views clean and maintainable.
- In web apps, route user requests to Controllers that prepare Models and select Views to render.
- Validate input in Controllers or Models to keep your app secure and robust.
- Keep your Controllers stateless when possible to simplify scaling and testing.
- Use strongly typed Models/ViewModels to catch errors early and improve IDE support.
- When your app grows, consider using Front Controller or Dispatcher patterns to centralize request handling.
14. MVVM (Model-View-ViewModel) Design Pattern
MVVM separates the UI (View) from the business logic and data (Model) by introducing a ViewModel that exposes data and commands the View binds to. It relies heavily on data binding to keep UI and logic synchronized.
Key components include:
1. Model:
- Stores data (e.g., user profiles, weather data).
- Handles business rules (e.g., validating passwords).
- Doesn’t care about the UI.
2. View:
- What the user interacts with (buttons, lists, forms).
- Doesn’t handle logic. It just displays data and sends user actions to the ViewModel.
3. ViewModel:
- Fetches data from the Model, prepares it for the View (e.g., formatting dates), and handles user actions (e.g., button clicks).
- Doesn’t know the View exists. It just exposes data and commands.
When to Use It?
Use this pattern when:
- You’re building apps with complex UIs
- You want automatic UI updates when data changes
- Your team wants to work on UI and logic at the same time without stepping on each other’s toes
MVVM shines when you're building:
- Desktop apps: Especially with frameworks like WPF, Angular, or Vue
- Mobile apps: Android with data binding, iOS with SwiftUI
- Web apps with reactive frameworks: Think Vue.js, Angular, or Knockout.js
- Anything where data changes a lot: Real-time dashboards, chat apps, live feeds
The Good and Bad
Pros
- Clear separation of UI and business logic
- ViewModel is easily testable
- Data binding reduces boilerplate UI update code
Cons
- Can add complexity, especially if data binding is not natively supported
- Debugging can be tricky (when things auto-update, it's harder to track what changed what)
- Steeper learning curve for beginners
How to Use It
- Model contains data and business rules.
- View displays UI and binds to ViewModel properties and commands.
- ViewModel exposes data and actions, interacts with Model, and notifies View on changes.
Simple JavaScript Example
Imagine a weather app that shows temperatures. Here’s how MVVM works:
<!-- View (HTML) -->
<div>
  <h1>Weather: <span id="temperature"></span></h1>
  <button onclick="viewModel.increaseTemp()">Increase Temp</button>
</div>

<script>
// Model (Data)
const weatherModel = {
  temp: 20,
  getTemperature() { return this.temp; },
  setTemperature(newTemp) { this.temp = newTemp; }
};

// ViewModel (Logic)
const viewModel = {
  increaseTemp() {
    weatherModel.setTemperature(weatherModel.getTemperature() + 1);
    updateView(); // Simulate data binding
  }
};

// Simulate data binding (updates View when Model changes)
function updateView() {
  document.getElementById("temperature").textContent =
    `${weatherModel.getTemperature()}°C`;
}

// Initial load
updateView();
</script>
What’s happening?
- Model: Stores the temperature.
- ViewModel: Handles the “Increase Temp” button click and updates the Model.
- View: Automatically shows the new temperature when the Model changes.
(In real apps, frameworks like Angular/Vue handle the binding automatically!)
Quick Implementation Tips
- Use a framework that supports data binding (like WPF, Angular, Vue, or React) to automate UI updates.
- Make your ViewModel expose data and commands as properties that the View can bind to.
- Implement INotifyPropertyChanged in your ViewModel to automatically notify the View of data changes. Use ObservableCollection for collections.
- Keep your View as “dumb” as possible: no logic, just data binding and UI elements.
- Use commands to handle user interactions and update the Model through the ViewModel.
- Think of the ViewModel as an adapter between the Model and View, formatting data and handling UI-specific logic.
- Test your ViewModels independently by mocking the Model and verifying UI-related behavior.
- Centralize data conversions in a separate layer if the ViewModel gets too complex.
- Keep the UI responsive by using asynchronous operations in the ViewModel.
Why These Patterns Matter
Writing code is only part of the job. You want your software to last, grow, and be easy to work with down the road. That’s where design patterns come in.
They help you:
Stop doing the same thing over and over:
You know that feeling when you solve a problem, then face the exact same problem next week? Patterns give you ready-made, reusable solutions.
Keep your code clean and easy to maintain:
When you need to fix something or add a feature, you won't spend hours trying to figure out what your old code does.
Build systems that scale smoothly:
Nothing's worse than your app breaking because too many people started using it. These patterns help you build things that can grow without exploding.
Code like someone who knows what they're doing:
These patterns come from developers who've made every mistake possible. Why learn the hard way when you can skip straight to the good stuff?
Wrapping This Up
You're not learning patterns to impress anyone at your next code review. You're learning them because:
- Patterns solve problems faster than starting from scratch.
- Bugs are expensive. Proven solutions have fewer surprises.
- Your brain has limits. Patterns reduce mental overhead.
- Teams need common language. "Use Observer here" beats a 20-minute explanation.
Will you use all ten patterns next week? Probably not.
They're like having a Swiss Army knife in your back pocket. You might not need the tiny scissors every day, but when you do need them, you're really glad they're there.
So don't overthink it.
Pick one pattern. Use it in your next project. See how it feels. Then pick another.
Before you know it, you'll be that developer who makes hard problems look easy.
And honestly? That's a pretty good place to be.
For Developers:
Ready to showcase your design pattern mastery? Join Index.dev's talent network and get matched with global companies seeking developers who build smart, scalable solutions. Start your remote career today.
For Clients:
Need developers who understand design patterns and write clean code? Access Index.dev's top 5% vetted developers, get matched in 48 hours, and start with a 30-day free trial. Build better software with elite talent.
